Out of the competitive pool
Fracture: callouts, site plans and setups
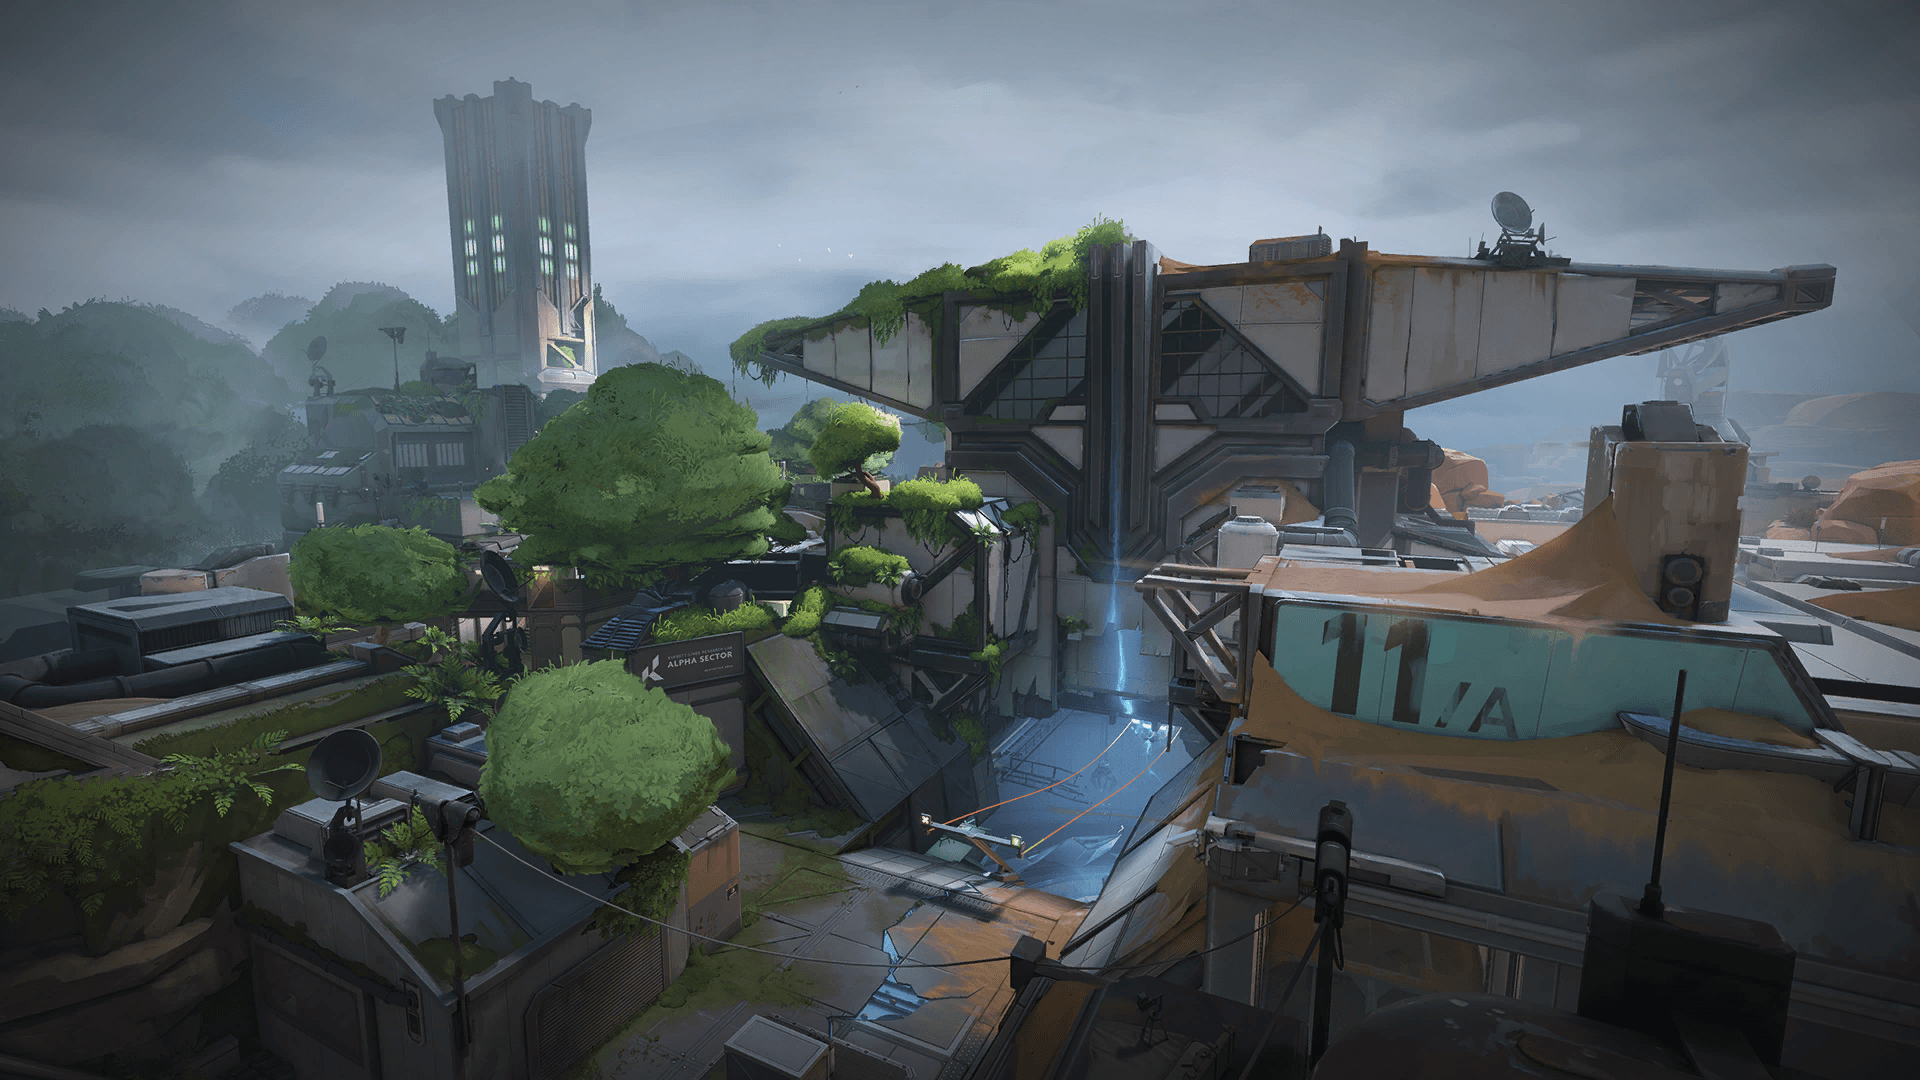
Fracture is a two-site map where attackers start at opposite ends, linked by a zipline, against defenders in the center. It left the competitive queue at patch 13.00.
- Sites
- Site A · Site B
- Release
- September 8, 2021, patch 3.05
- Status
- Out of the competitive pool
Callouts
The official in-game names, as your client shows them, with the English name you will often hear in voice comms.
Scroll the map to read every name.
Site A
| In-game name |
|---|
| A Link |
| A Hall |
| A Door |
| A Rope |
| A Main |
| A Site |
| A Drop |
| A Dish |
| A Gate |
Site B
| In-game name |
|---|
| B Bench |
| B Arcade |
| B Tower |
| B Site |
| B Generator |
| B Link |
| B Canteen |
| B Main |
| B Tree |
| B Tunnel |
Spawns
| In-game name |
|---|
| Attacker Spawn |
| Defender Spawn |
| Attacker Spawn |
Map layout
Fracture has a unique structure: a rift splits the map, attackers have two starting zones, one on each side, and defenders start in the center. Two one-way ziplines link the two ends, which lets you pick your site at the start of the round or fake. From the defender spawn, you reach both sites right from the start of the round, while attackers can only get there by crossing a site. On the minimap, A is on the right and B on the left, and each site is taken from the top and the bottom of the map, so rounds are often played as a pincer.
Key features
Two attacker spawns and a zipline
Attackers reach the other end of the map by two one-way ziplines. Once you leave, you can't change direction, use an ability, get off or stop completely (Shift slows you down). Use it to fake a site.
The defender spawn, the map's crossroads
Defenders start in the center of the map and reach both sites right from the start of the round. Attackers can only reach that spawn by crossing a site: a defensive rotation is therefore more direct than an attacker one.
Patch 5.07 reshaping
On October 4, 2022, Riot removed the far path of A Dish, removed the coin flip at the A Drop entrance and adjusted A Rope, which attackers controlled too easily with a single smoke. B got a ramp onto the site platform.
Four ultimate orbs
Fracture has four ultimate orbs, instead of two on most maps: A Hall, A Dish, B Arcade and B Main. Map control therefore counts double, since it also earns ultimate charges.
Site A
A is a compact site with two big accesses: A Drop, which comes down from the top of the map, and A Main, which climbs from the bottom. A Link and A Rope connect the site to the defender spawn. Patch 5.07 simplified the site and removed the far path of A Dish.
Attack plan
Pick the pincer: part of the team comes down through A Gate, A Dish and A Drop, the rest climbs through A Hall, A Door and A Main. Since patch 5.07, A Drop is no longer a coin flip at the entrance, and pushing from both sides at once puts the defense under pressure. Plant in the A zone, then cover the accesses as a group.
- 1Route : Entry from the top: A Gate, A Dish, A Drop
- 2Route : Entry from the bottom: A Hall and A Main
- 3Plant : Plant in the A zone
Defense plan
Attackers come from two sides. Hold A Dish to watch the top and A Hall for the bottom, with one player under the platform at the back of the site. Get info on A Rope: patch 5.07 gave defenders more options there to hold and retake the site. Group up before you retake A.
- 1Hold : Hold from A Dish
- 2Hold : Hold from A Hall
- 3Hold : Hold under the back platform
- 4Info : Info on A Rope
Site B
B is a site with two accesses, from the top of the map and from the bottom. Patch 5.07 replaced the jump onto the platform with a ramp, tightened B Generator so it is easier to smoke and opened an attacker hiding spot in B Arcade.
Attack plan
Split the team between the top (B Bench, B Arcade) and the bottom (B Tree, B Main) to take the site in a pincer. Smoke B Generator, tightened in patch 5.07 to be easier to block. From B Arcade, the hiding spot added in the same patch helps attackers hold against defenders pushing from both directions. Plant in the B zone.
- 1Smoke : Smoke B Generator
- 2Route : Entry from the top: B Bench and B Arcade
- 3Route : Entry from the bottom: B Tree and B Main
- 4Plant : Plant in the B zone
- 5Hold : Hold from the B Arcade hiding spot
Defense plan
Hold B Tower, up high, where you can see the attackers' feet in B Arcade. Keep the back of the site, behind the crates. Watch the B Arcade entrance and the B Tree entrance, the two accesses to guard. Play the pincer as a duo: attackers can come from the top as well as the bottom.
- 1Hold : Hold from B Tower
- 2Hold : Hold the back of the site
- 3Hold : Watch the B Arcade entrance
- 4Hold : Watch the B Tree entrance
Agent setups
The placements top guides recommend on this map, ability by ability.
 Killjoy
All Killjoy setupsKilljoy A: Turret at the back, Nanoswarms on the entrance and A Drop, Alarmbot on A Rope
Defense · Site A- 1
 Nanoswarm : Nanoswarm at the site entrance, A Main side
 - 2
 TURRET : Turret in the back right corner, view of A Link and A Rope
 - 3Nanoswarm : Second Nanoswarm, at the foot of A Drop
- 4
 ALARMBOT : Alarmbot on A Rope, to be warned of an arrival that way
Killjoy B: Nanoswarm on B Main, Turret behind the crates, Alarmbot in Tower
Defense · Site B- 1Nanoswarm : Nanoswarm at the site entrance from B Main
- 2TURRET : Turret behind the crates on the site
- 3ALARMBOT : Alarmbot in B Tower, near the climbing rope
- 4Nanoswarm : Second Nanoswarm inside B Tower
 Cypher
All Cypher setupsCypher A: Trapwires on A Drop and A Main, one-way Cyber Cage on A Door
Defense · Site A- 1
 Trapwire : Trapwire along A Drop
 - 2Trapwire : Trapwire at the A Main entrance
- 3
 Cyber Cage : One-way Cyber Cage on the frame of the mechanical door, thrown from a corner of A Rope
Cypher B: Trapwires on B Main and B Arcade, one-way Cyber Cage in B Arcade
Defense · Site B- 1Trapwire : Trapwire along B Main
- 2Trapwire : Trapwire on the B Arcade route to the site
- 3Cyber Cage : One-way Cyber Cage, thrown from the corner near the B Arcade crates
Sample comp
 PhoenixDuelistPhoenix opens duels as a duelist, with his flashes and his heals, and is in MetaBot's typical comp.
 FadeInitiatorFade gives info on both sides of a site before the pincer closes.
 RazeDuelistRaze clears the tight corners of both sites with her explosives, according to MetaBot's typical comp.
 CypherSentinelCypher, the comp's sentinel, covers the narrow accesses and the rotations with his Trapwires.
 CloveControllerClove, a controller, completes MetaBot's typical comp and brings the map's smokes.
Comp given as is by the MetaBot FAQ (page showing October 15, 2026, a date considered unreliable because it is generated in bulk on the site). Not a pro comp: Fracture is no longer in competitive.
Fracture tips
- On Fracture, play the tempo: take info on both sides, avoid executing blind and focus on your post-plant rather than forcing an entry.
- The zipline is one-way and you can't get off once you launch: only take it after you've decided on your site, or to fake a side.
- Attackers can only reach the defender spawn by crossing a site: on defense, use it to rotate more directly between A and B.
- On the map's long lines of sight, already have your crosshair at head height on the angle you are opening: an accurate long-range weapon works well on defense.
- To take a site, go for the pincer: part of the team goes through the top of the map, the other through the bottom, so you see the defenders from both sides.
Other maps
 AbyssCompetitive poolSite A · Site BAbyss is a two-site map with three lanes and no boundary walls: falling into the void kills instantly. It has been in the competitive queue since patch 13.04, in August 2026.4 setups
 BindCompetitive poolSite A · Site BBind has two sites, A and B, and no mid: two one-way teleporters link the sides. It is back in the competitive queue since patch 13.08.4 setups
 CorrodeCompetitive poolSite A · Site BCorrode is a two-site, three-lane map in a medieval fortress, with a long, narrow mid. It has been in the competitive queue since patch 11.00 and came back in 13.08.4 setups
 HavenCompetitive poolSite A · Site B · Site CHaven is the three-site map: A at the top of the minimap, B in the middle, C at the bottom. Attackers start from the east and pick a target, while defenders have to cover everything.4 setups
 LotusCompetitive poolSite A · Site B · Site CLotus is a three-site map, A, B and C, set in a city of flowers in India. It plays with rotating doors, a breakable wall on the A side and a silent drop.6 setups
 SummitCompetitive poolSite A · Site BSummit is a two-site map with three lanes, set in a Radiant academy in the mountains. Three reactive walls close during the round and change the rotations.
 SunsetCompetitive poolSite A · Site BSunset is a classic two-site, three-lane map set in Los Angeles. Mid is wide and links the two sites through connectors: whoever holds it sets the pace of the round.5 setups
 AscentOut of the competitive poolSite A · Site BAscent is a two-site map inspired by Venice, with a big open mid linking the two sites. It left the competitive queue in patch 13.08.4 setups
 BreezeOut of the competitive poolSite A · Site BBreeze is a two-site map on an island. Largely rebuilt at patch 12.00, it left the competitive queue at patch 13.04: be wary of guides from before January 2026.
 IceboxOut of the competitive poolSite A · Site BIcebox is a two-site map set in a frozen worksite: lots of height, stacked containers, a zipline at A and a mid split by the tube and the boiler.4 setups
 PearlOut of the competitive poolSite A · Site BPearl is a two-site map set in an underwater city, with no ropes and no teleporters. It left the competitive queue at patch 13.00.
 SplitOut of the competitive poolSite A · Site BSplit is a two-site map, A at the top and B at the bottom, linked by a mid. Narrow, full of high ground and ropes, it has a reputation for favoring defense.
A plan won't aim for you: measure your aim.
Sources
- playvalorant.com (opens in a new tab)
- playvalorant.com (2) (opens in a new tab)
- playvalorant.com (3) (opens in a new tab)
- playvalorant.com (4) (opens in a new tab)
- thespike.gg (opens in a new tab)
- oneesports.gg (opens in a new tab)
- attackofthefanboy.com (opens in a new tab)
- playerassist.com (opens in a new tab)
- metabot.gg (opens in a new tab)
- metabot.gg (2) (opens in a new tab)
Updated on October 15, 2026
Patch 13.08 data. Map names, callouts and minimaps: Riot Games, via valorant-api.com.